- 「ハッシュ化」とは、単語や文章などを数値に変換する方法です。
- ハッシュ値を索引にデータを保存すると、長い情報も短い数字で表せるのでたくさんの情報を小さなスペースで管理できます。
- また、元の文字列には戻せない一方通行の変換ですが、同じ文字列からは同じハッシュ値になるので「照合」に使えます。
1. ハッシュ関数とハッシュ化、ハッシュ値
「ハッシュ化」とは、’apple’や’password123’といった文字列を、「10」や「63」のような数値に変換する方法です。
長い文字列を短い数字で表現できるので、データの管理や検索を効率的に行えます。
「ハッシュ関数」とは、例えば このような関数です。
文字列(キー)を受け取り、それを固定サイズの整数値(ハッシュ値)に変換する役割を果たします。
この方法は「加法ハッシュ法」と呼ばれます。
ハッシュ値がテーブルに収まるように、計算結果をテーブルのサイズで割った余りが最終的なハッシュ値になります。

31という素数は、多くのハッシュ関数で使われています。
異なる文字列が偶然に同じハッシュ値になることもありますが、簡単なわりにそれなりに良い結果を出します。
#include <stdio.h>
#include <stdlib.h>
#include <string.h>

#define TABLE_SIZE 100

unsigned int hash(const char* key) {
    unsigned int hash = 0;
    while (*key) {
        hash = ((hash * 31) + *key) % TABLE_SIZE;
        key++;
    }
    return hash;
}

int main() {

    printf("Value of 'apple': %d\n", hash("apple"));
    printf("Value of 'banana': %d\n", hash("banana"));
    printf("Value of 'orange': %d\n", hash("orange"));
    printf("Value of 'password123': %d\n", hash("password123"));

    return 0;
}
計算の仕方はいろんな方法があります。
数値そのものにはあまり意味がありませんが、文字列ごとに(実用上)ユニークな数値を返すことに意味があります。
2. ハッシュテーブル
このハッシュ値は、限られたメモリにデータを保管するのに活用できます。

ハッシュテーブルは、文字列をキーワードとしてデータを探すときに、単純な配列に比べて高速にアクセスできます。
また、すべての単語に対応する保存領域を用意せずとも、必要な項目のつど追加できます。
まずは、ハッシュによる簡単な連想配列の実装をC言語で作ってみます。
100行の表にいくつかの単語と数値を記録します。
「ハッシュテーブル」は、データを効率的に格納し検索するためのデータ構造です。
キーと値のペアでデータを保存し、キーをハッシュ関数で変換して格納位置を決定します。
2.1. コードによるかんたんな実例
実際に、かんたんなハッシュテーブルをC言語で実装して、基本的な操作(作成、挿入、取得、解放)を試してみます。

int main() {
    /* ハッシュテーブルの作成 */
    HashTable* ht = createHashTable();

    /* データの挿入 */
    insert(ht, "apple", 5);
    insert(ht, "banana", 7);
    insert(ht, "orange", 3);

    /* データの取得と表示 */
    printf("Value of 'apple': %d\n", get(ht, "apple"));
    printf("Value of 'banana': %d\n", get(ht, "banana"));
    printf("Value of 'grape': %d\n", get(ht, "grape"));

    /* メモリの解放 */
    freeHashTable(ht);
    return 0;
}| 関数/構造体名 | 説明 |
|---|---|
HashTable 構造体 | ハッシュテーブルを表現します。 キーと値のペアを格納するためのデータ構造です。 |
hash 関数 | キー(文字列)をハッシュ値(整数)に変換します。 この値はテーブル内の位置を決定するために使用されます。 |
createHashTable 関数 | 新しいハッシュテーブルを作成します。 テーブルのメモリを確保し、初期化を行います。 |
insert 関数 | キーと値のペアをハッシュテーブルに挿入します。 キーに基づいてハッシュ値を計算し、適切な位置にデータを格納します。 |
get 関数 | 指定されたキーに対応する値をハッシュテーブルから取得します。 キーが存在しない場合は特定の値(例:-1)を返します。 |
freeHashTable 関数 | ハッシュテーブルが使用していたメモリを解放します。 テーブル自体と、格納されていた全てのキーと値のペアのメモリを解放します。 |
#include <stdio.h>
#include <stdlib.h>
#include <string.h>

#define TABLE_SIZE 100

typedef struct {
    char* key;
    int value;
} HashNode;

typedef struct {
    HashNode* table[TABLE_SIZE];
} HashTable;

unsigned int hash(const char* key) {
    unsigned int hash = 0;
    while (*key) {
        hash = (hash * 31) + *key;
        key++;
    }
    return hash % TABLE_SIZE;
}

HashTable* createHashTable() {
    HashTable* ht = malloc(sizeof(HashTable));
    for (int i = 0; i < TABLE_SIZE; i++) {
        ht->table[i] = NULL;
    }
    return ht;
}

void insert(HashTable* ht, const char* key, int value) {
    unsigned int index = hash(key);
    HashNode* node = malloc(sizeof(HashNode));
    node->key = strdup(key);
    node->value = value;
    ht->table[index] = node;
}

int get(HashTable* ht, const char* key) {
    unsigned int index = hash(key);
    HashNode* node = ht->table[index];
    if (node != NULL && strcmp(node->key, key) == 0) {
        return node->value;
    }
    return -1;  // Key not found
}

void freeHashTable(HashTable* ht) {
    for (int i = 0; i < TABLE_SIZE; i++) {
        if (ht->table[i] != NULL) {
            free(ht->table[i]->key);
            free(ht->table[i]);
        }
    }
    free(ht);
}

int main() {
    HashTable* ht = createHashTable();

    insert(ht, "apple", 5);
    insert(ht, "banana", 7);
    insert(ht, "orange", 3);

    printf("Value of 'apple': %d\n", get(ht, "apple"));
    printf("Value of 'banana': %d\n", get(ht, "banana"));
    printf("Value of 'grape': %d\n", get(ht, "grape"));

    freeHashTable(ht);
    return 0;
}
この実装は簡単なものであり、衝突解決のための機能(チェイニングやオープンアドレッシングなど)は含まれていません。
実際の使用では、これらの機能を追加することで、より堅牢なハッシュテーブルを作成できます。
2.2. データをハッシュテーブルに挿入する
insert関数では、文字列に対応した値(value)を、ハッシュ値の番号の区画に保存しています。
void insert(HashTable* ht, const char* key, int value) {
    unsigned int index = hash(key);
    HashNode* node = malloc(sizeof(HashNode));
    node->key = strdup(key);
    node->value = value;

    ht->table[index] = node;
}insert(ht, "apple", 5);“apple”のハッシュ値は「10」になるので、”apple” と 与えた数値 5 は、ハッシュテーブルの10番地に保管されます。

ただし、この単純な方法では、同じハッシュ値を持つ異なる文字列が出てきたときの対処法がありません。
新しい値で古い値が上書きされてしまう可能性があることには注意が必要です。
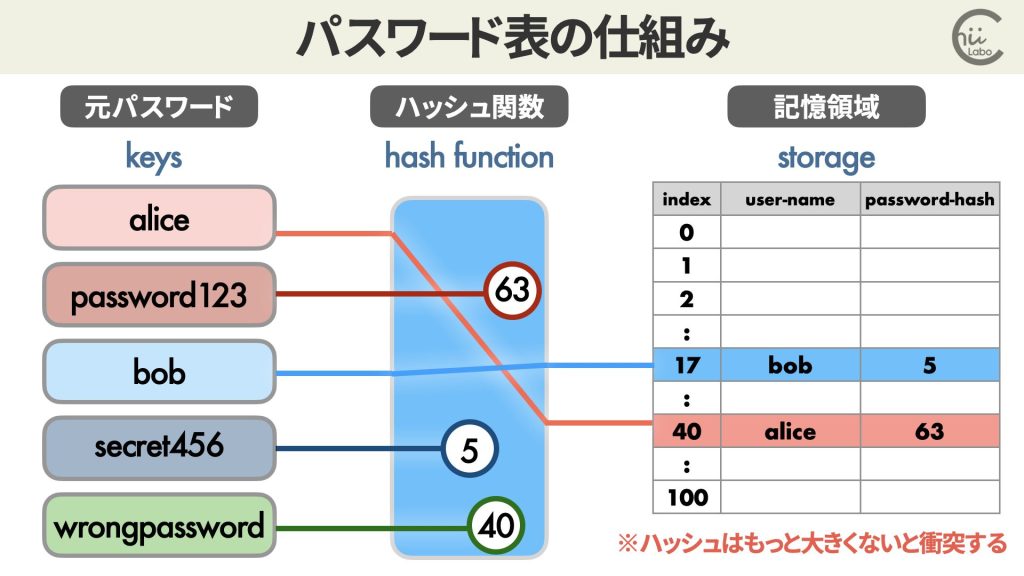
3. パスワードのデータベース
ハッシュは、パスワードの安全な保存にも使うことができます。
簡単なハッシュ関数を使用してパスワードの保存と照合を行う実装を作ってみます。

記憶領域には、パスワードそのものではなく、ハッシュ値を保存しています。
3.1. コードによるかんたんな実例
かんたんなパスワードデータベースにユーザーを追加して、その後 パスワードを照合する操作を試してみます。
int main() {
    UserDatabase* db = createUserDatabase();

    // ユーザー登録
    addUser(db, "alice", "password123");
    addUser(db, "bob", "secret456");

    // パスワード照合
    printf("Alice's password verification: %s\n",
           verifyPassword(db, "alice", "password123") ? "Success" : "Failure");
    printf("Alice's wrong password verification: %s\n",
           verifyPassword(db, "alice", "wrongpassword") ? "Success" : "Failure");
    printf("Bob's password verification: %s\n",
           verifyPassword(db, "bob", "secret456") ? "Success" : "Failure");
    printf("Non-existent user verification: %s\n",
           verifyPassword(db, "charlie", "password") ? "Success" : "Failure");

    freeUserDatabase(db);
    return 0;
}| 構成要素 | 説明 |
|---|---|
UserDatabase 構造体 | ユーザー情報を格納するハッシュテーブル。 ユーザーのデータを効率的に管理するためのデータ構造。 |
addUser 関数 | 新しいユーザーを追加する機能。 ユーザー名をキーとして使用し、パスワードをハッシュ化して保存する。 ユーザー登録プロセスを担当。 |
verifyPassword 関数 | ユーザー名とパスワードを受け取り、保存されているハッシュ値と照合する機能。 ログイン認証プロセスを担当。 |
#include <stdio.h>
#include <stdlib.h>
#include <string.h>

#define TABLE_SIZE 100
#define MAX_PASSWORD_LENGTH 50

typedef struct {
    char* username;
    unsigned int password_hash;
} User;

typedef struct {
    User* users[TABLE_SIZE];
    int count;
} UserDatabase;

unsigned int hash(const char* str) {
    unsigned int hash = 0;
    while (*str) {
        hash = (hash * 31) + *str;
        str++;
    }
    return hash % TABLE_SIZE;
}

UserDatabase* createUserDatabase() {
    UserDatabase* db = malloc(sizeof(UserDatabase));
    for (int i = 0; i < TABLE_SIZE; i++) {
        db->users[i] = NULL;
    }
    db->count = 0;
    return db;
}

void addUser(UserDatabase* db, const char* username, const char* password) {
    unsigned int index = hash(username);
    User* user = malloc(sizeof(User));
    user->username = strdup(username);
    user->password_hash = hash(password);
    db->users[index] = user;
    db->count++;
}

int verifyPassword(UserDatabase* db, const char* username, const char* password) {
    unsigned int index = hash(username);
    User* user = db->users[index];
    if (user != NULL && strcmp(user->username, username) == 0) {
        return user->password_hash == hash(password);
    }
    return 0; // User not found
}

void freeUserDatabase(UserDatabase* db) {
    for (int i = 0; i < TABLE_SIZE; i++) {
        if (db->users[i] != NULL) {
            free(db->users[i]->username);
            free(db->users[i]);
        }
    }
    free(db);
}

int main() {
    UserDatabase* db = createUserDatabase();

    // ユーザー登録
    addUser(db, "alice", "password123");
    addUser(db, "bob", "secret456");

    // パスワード照合
    printf("Alice's password verification: %s\n",
           verifyPassword(db, "alice", "password123") ? "Success" : "Failure");
    printf("Alice's wrong password verification: %s\n",
           verifyPassword(db, "alice", "wrongpassword") ? "Success" : "Failure");
    printf("Bob's password verification: %s\n",
           verifyPassword(db, "bob", "secret456") ? "Success" : "Failure");
    printf("Non-existent user verification: %s\n",
           verifyPassword(db, "charlie", "password") ? "Success" : "Failure");

    freeUserDatabase(db);
    return 0;
}3.2. パスワードをハッシュ化して保存する
addUser関数でパスワードをハッシュ化して保存し、verifyPassword 関数で入力をハッシュ化して照合します。
void addUser(UserDatabase* db, const char* username, const char* password) {
    unsigned int index = hash(username);

    User* user = malloc(sizeof(User));
    user->username = strdup(username);
    user->password_hash = hash(password);

    db->users[index] = user;
    db->count++;
}ユーザーごとに、ユーザー名とパスワードハッシュを記録しています(user->password_hash = hash(password))。
typedef struct {
    char* username;
    unsigned int password_hash;
} User;この方法のメリットは、パスワードそのものを保管せずに済むことです。

データベースを使ってパスワードの照合はできるものの、パスワードがなにかは残っていないのです。

ただし、この実装は教育目的であり、実際のアプリケーションでの使用には適していません。
実際のパスワード保存には、より安全なハッシュ関数とソルトの使用が必要です。
![[iPhone] パスワードが流出した恐れがある?チェック機能](https://chiilabo.com/wp-content/uploads/2024/07/image-22-1024x576.jpg)


