![[Cocoon]ブログカードの表示順を変更してみる【functions.phpに追加する方法】](https://chiilabo.com/wp-content/uploads/2024/04/image-16-15-1024x576.jpg)
- Cocoonテーマのブログカードをはてなブログ風のデザインに変更する方法を紹介します。
- functions.phpファイル内の
url_to_internal_blogcard_tag関数を修正して、ブログカードの要素の表示順を変更します。 - ブログロゴを上部に移動させ、CSSで抜粋のフォントサイズなどを調整することで、目的のデザインを実現できます。
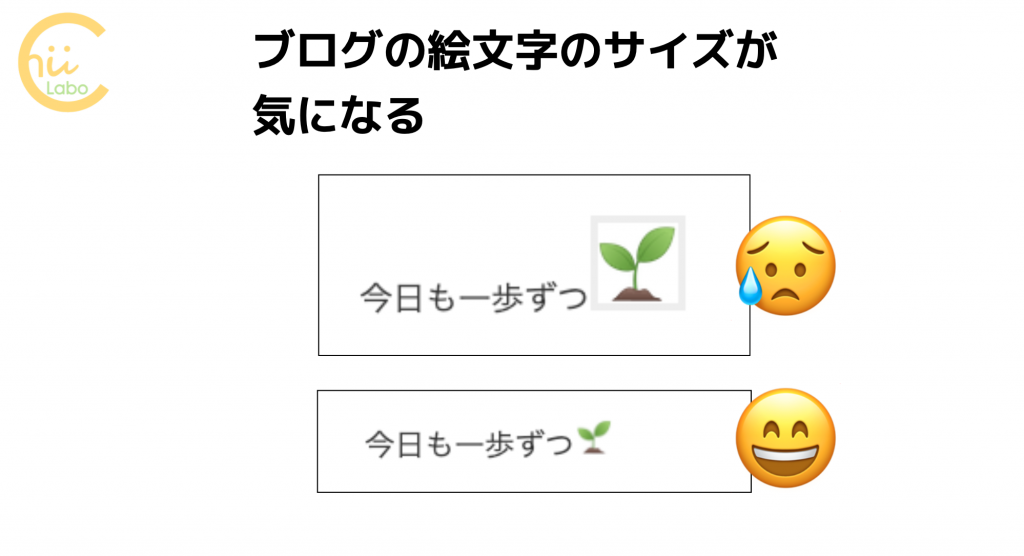
1. ブログカードを「はてなブログ風」のデザインにしたい
今のブログ(Cocoonのもとのデザイン)がこんな感じです。
これを、はてなブログ風にしてみたいんですよね。
つまり、目標は、ブログカードの下(blogcard-footer)になっているブログロゴを上に上げる、ということです。
こちらの記事を参考に、ブログカードの表示順をPHPコードで変更してみることにしました。
2. ログカードのHTMLを生成する関数の置き換え(url_to_internal_blogcard_tag)
基本的な考え方はブログカードのHTMLを生成する関数の置き換えです。
if ( !function_exists( 'url_to_internal_blogcard_tag' ) ):
function url_to_internal_blogcard_tag($url){
この後に続きますが、子テーマのfunction.phpの中で、url_to_internal_blogcard_tag()という関数を変更しています。
元記事の「取得した情報からブログカードのHTMLタグを作成」以降の部分の<div>を入れ替えることで、順序を変更しました。
//内部URLからブログカードタグの取得
if ( !function_exists( 'url_to_internal_blogcard_tag' ) ):
function url_to_internal_blogcard_tag($url){
  if ( !$url ) return;
  $url = strip_tags($url);//URL
  $id = url_to_postid( $url );//IDを取得(URLから投稿ID変換)
  //内部ブログカード作成可能なURLかどうか
  if ( !is_internal_blogcard_url($url) ) return;
  //_v($url);

  $no_image = get_site_screenshot_url($url);
  $thumbnail = null;
  $date_tag = null;
  //投稿・固定ページの場合
  if ($id) {
    //global $post;
    $post_data = get_post($id);
    setup_postdata($post_data);
    $exce = $post_data->post_excerpt;

    $title = $post_data->post_title;//タイトルの取得

    // if (is_wpforo_plugin_page($url)) {
    //   $title = wp_get_document_title();
    // }

    //メタディスクリプションの取得
    $snipet = get_the_page_meta_description($id);
    // _v($id);
    // _v($snipet);
    //$snipet = get_the_snipet( get_the_content(), get_entry_card_excerpt_max_length() );
    //投稿管理画面の抜粋を取得
    if (!$snipet) {
      $snipet = $post_data->post_excerpt;
    }
    //記事本文の抜粋文を取得
    if (!$snipet) {
      $snipet = get_content_excerpt($post_data->post_content, get_entry_card_excerpt_max_length());
    }
    $snipet = preg_replace('/\n/', '', $snipet);

    //日付表示
    $date = null;
    $post_date = mysql2date(get_site_date_format(), $post_data->post_date);
    switch (get_internal_blogcard_date_type()) {
      case 'post_date':
        $date = $post_date;
        break;
      case 'up_date':
        $date = mysql2date(get_site_date_format(), $post_data->post_modified);
        if (!$date) {
          $date = $post_date;
        }
        break;
    }
    if (is_internal_blogcard_date_visible()) {
      $date = '<div class="blogcard-post-date internal-blogcard-post-date">'.$date.'</div>';//日付の取得
      $date_tag = '<div class="blogcard-date internal-blogcard-date">'.$date.'</div>';
    }


    //サムネイルの取得(要160×90のサムネイル設定)
    $thumbnail = get_the_post_thumbnail($id, get_internal_blogcard_thumbnail_size(), array('class' => 'blogcard-thumb-image internal-blogcard-thumb-image', 'alt' => ''));

  } elseif (is_home_url($url)){
    //トップページの場合
    $title = get_front_page_title_caption();
    $snipet = get_front_page_meta_description();
    $image = get_ogp_home_image_url();
    if (!empty($image)) {
      $thumbnail = get_blogcard_thumbnail_image_tag($image);
    }
  } elseif ($cat = get_category_by_path($url, false)){
    //カテゴリページの場合
    $cat_id = $cat->cat_ID;
    //_v(get_category_meta($cat_id));
    $title = get_category_title($cat_id);
    $snipet = get_category_snipet($cat_id);
    $image = get_category_eye_catch($cat_id);
    //_v($image);
    if ($image) {
      $thumbnail = get_blogcard_thumbnail_image_tag($image);
    }
    // _v($cat);
    // $title = get_front_page_title_caption();
    // $snipet = get_front_page_meta_description();
    // $image = get_ogp_home_image_url();

  }
  //_v(get_category_by_path($url));

  //サムネイルが存在しない場合
  if ( !$thumbnail ) {
    $thumbnail = get_blogcard_thumbnail_image_tag($no_image);
  }

  //ブログカードのサムネイルを右側に
  $additional_class = get_additional_internal_blogcard_classes();

  //新しいタブで開く場合
  $target = is_internal_blogcard_target_blank() ? ' target="_blank"' : '';

  //ファビコン
  $favicon_tag =
  '<div class="blogcard-favicon internal-blogcard-favicon">'.
    '<img src="//www.google.com/s2/favicons?domain='.get_the_site_domain().'" class="blogcard-favicon-image internal-blogcard-favicon-image" alt="" width="16" height="16" />'.
  '</div>';

  //サイトロゴ
  $site_logo_tag = '<div class="blogcard-domain internal-blogcard-domain">'.get_the_site_domain().'</div>';
  $site_logo_tag = '<div class="blogcard-site internal-blogcard-site">'.$favicon_tag.$site_logo_tag.'</div>';

  //取得した情報からブログカードのHTMLタグを作成
  //_v($url);
  $tag =
  '<a href="'.$url.'" title="'.esc_attr($title).'" class="blogcard-wrap internal-blogcard-wrap a-wrap cf"'.$target.'>'.
    '<div class="blogcard internal-blogcard'.$additional_class.' cf">'.
      '<figure class="blogcard-thumbnail internal-blogcard-thumbnail">'.$thumbnail.'</figure>'.
      '<div class="blogcard-content internal-blogcard-content">'.
        '<div class="blogcard-title internal-blogcard-title">'.$title.'</div>'.
        '<div class="blogcard-snipet internal-blogcard-snipet">'.$snipet.'</div>'.
        '<div class="blogcard-footer internal-blogcard-footer cf">'.
          $site_logo_tag.$date_tag.
        '</div>'.
      '</div>'.
    '</div>'.
  '</a>';

  return $tag;
}
endif;
変更した部分。
  //取得した情報からブログカードのHTMLタグを作成
  //_v($url);
  $tag =
  '<a href="'.$url.'" title="'.esc_attr($title).'" class="blogcard-wrap internal-blogcard-wrap a-wrap cf"'.$target.'>'.
    '<div class="blogcard internal-blogcard'.$additional_class.' cf">'.
      '<figure class="blogcard-thumbnail internal-blogcard-thumbnail">'.$thumbnail.'</figure>'.
      '<div class="blogcard-content internal-blogcard-content">'.
        '<div class="blogcard-footer internal-blogcard-footer cf">'.
          $site_logo_tag.$date_tag.
        '</div>'.
        '<div class="blogcard-title internal-blogcard-title">'.$title.'</div>'.
        '<div class="blogcard-snipet internal-blogcard-snipet">'.$snipet.'</div>'.
      '</div>'.
    '</div>'.
  '</a>';
こんな感じにできました。
あとは、抜粋(snippet)のフォントサイズなどCSSで編集すれば良さそうです。
こちらもどうぞ
![[Cocoon]外部ブログカードのサイトアイコンを上に移動した【CSSのposition:absolute】](data:image/svg+xml;base64,PHN2ZyB4bWxucz0iaHR0cDovL3d3dy53My5vcmcvMjAwMC9zdmciIHdpZHRoPSIxOTIwIiBoZWlnaHQ9IjEwODAiIHZpZXdCb3g9IjAgMCAxOTIwIDEwODAiPjxyZWN0IHdpZHRoPSIxMDAlIiBoZWlnaHQ9IjEwMCUiIGZpbGw9IiNmZmZmZmYiLz48L3N2Zz4=)

![[Cocoon]外部ブログカードのサイトアイコンを上に移動した【CSSのposition:absolute】](https://chiilabo.com/wp-content/uploads/2024/05/image-13-2-1024x576.jpg)
[Cocoon]外部ブログカードのサイトアイコンを上に移動した【CSSのposition:absolute】
以前、funtions.phpでテンプレートを変更することで、ブログカードのデザインを変更しました。しかし、「デザインを変更するならCSS」ということで、改めて挑戦してみました。こんなふうに変えましたいつものようにビフォー・アフターをお見せします。↓こうなりました。HTML要素を変更せずにちゃんとCSSでデザインを変えられました。CSSコードはこちらポイントはblogcard-footer要素の位置をabsolute(絶対配置)にして、移動することです。親要素内に自由に配置で...
chiilabo.com
![CocoonのSNSフォローボタンが大きかったので小さくした(border-radius)[CSS]](https://chiilabo.com/wp-content/uploads/2022/02/image-49-1024x576.png)
CocoonのSNSフォローボタンが大きかったので小さくした(border-radius)[CSS]
ちいラボのブログ メンテナンス日記!今日は「フォローボタン」のデザインをおしゃれにしてみました。メモしておきます。環境WordPress 5.5.1 (Cocoon テーマ バージョン: 2.2.3.1)「SNSフォロー」ボタンを見つけたホームページのメンテナンスをしながら「Cocoon設定」を見ていたら、「SNSフォロー」ボタンがありました。さっそく表示させてみたところ、スマホでみると3行とだいぶ「目立ちすぎる」感じです。フォローボタンが5つもあると、ちょっと圧迫感がありま...
chiilabo.com
QRコードを読み込むと、関連記事を確認できます。
![[Cocoon]ブログカードの表示順を変更してみる【functions.phpに追加する方法】](https://api.qrserver.com/v1/create-qr-code/?data=?size=200x200&data=https%3A%2F%2Fchiilabo.com%2F2020-09%2Fcss-function-php-cocoon-blogcard%2F)